

Review: Ableton Push Controller For Live
Ableton’s controller will push all the right buttons, especially if you have a thing for Isomorphic note layouts, all-in-one drum arranging, and pads that glow all the colours of the rainbow.
25 September 2013
Review: Tim Shiel
Try explaining to your mother why your studio is filled with keyboards that don’t actually make any sound, and you’ll realise that the modern MIDI controller is a recent phenomenon with only a short history. Generally cheap and cheerful bits of kit, these plastic controllers might feature keys, pads, faders, knobs or some combination of all these. Though unable to generate sound themselves, they can liberate a world of synthesis hidden deep in the bowels of your computer. Utilitarian and affordable, they’ve played an important role in the ongoing democratisation of music production, allowing producers and performers to unlock waveforms stuck inside their laptops in a way they feel comfortable with — using their fingers.
As useful as these devices are, it can be hard to think of them as being musical instruments. After all, you don’t need to hook up a grand piano like an inkjet printer for it to generate sound. But Ableton would prefer you refer to its newly developed controller, Push, as exactly that: a ‘music making instrument’.
FOCUS ON THE ACTION
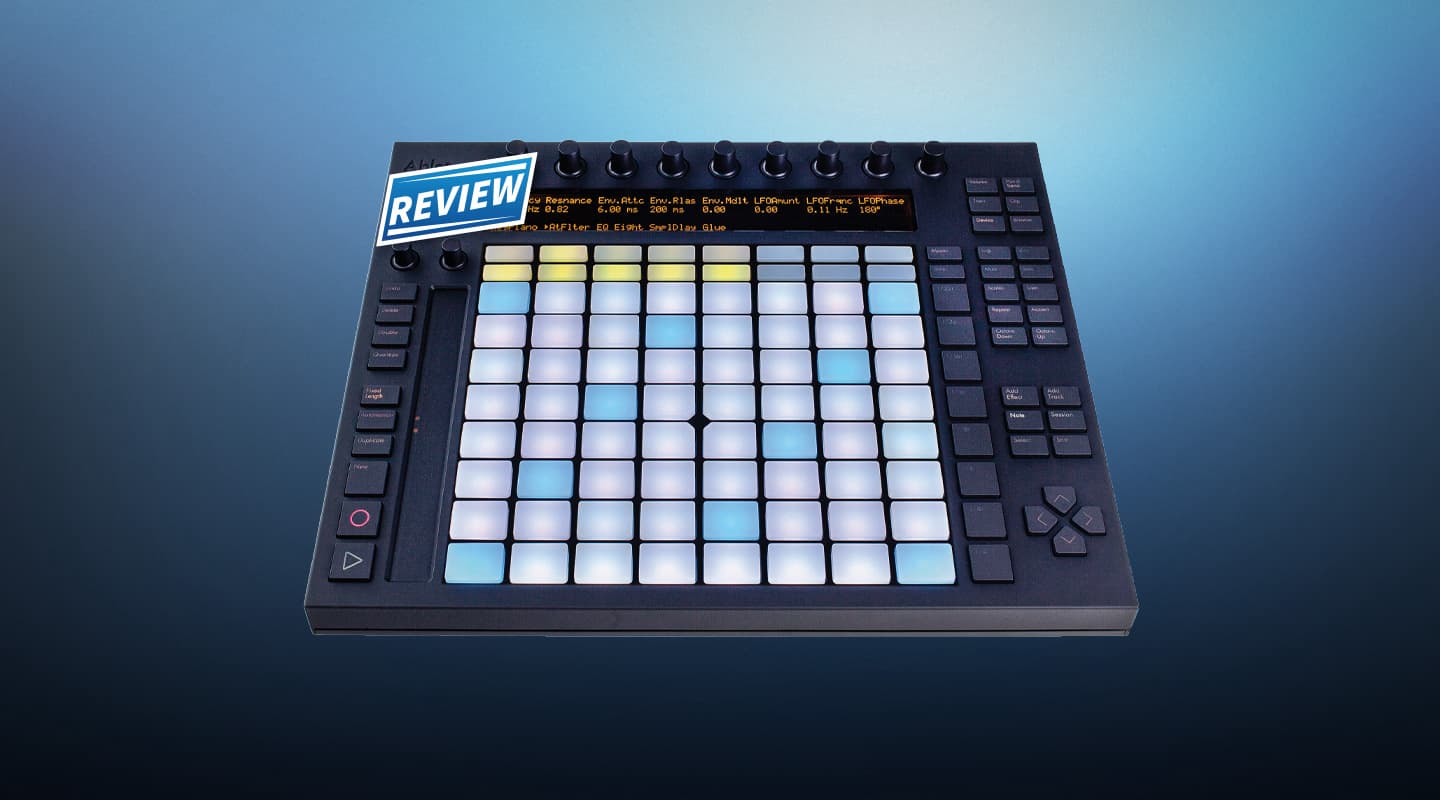
Developed in-house by Ableton (with some engineering assistance from Akai), Push is designed to tightly integrate with Ableton’s flagship DAW, Live. This is made obvious by the central design feature of Push, an eight-by-eight grid of pads that instantly echoes Live’s Session View. This grid is used not just for clip triggering and navigation, but for playing both drums and instruments. One of the more notable differences between Push and previous Live-geared hardware such as Novation’s Launchpad or Akai’s APC is the full gamut of colours available on each pad. By opening up the colour palette, it allows Push to integrate more unique features and increase user feedback.
Surrounding the pad grid is a host of backlit buttons that integrate with Live’s transport, scene and workflow systems. These buttons black out when not relevant to Push’s current mode, which is a small but useful detail. There’s also a touch strip, a monochromatic LED display providing text feedback sent from Live’s devices, and a series of endless rotary faders whose functions are context-sensitive. In the top left corner, an embossed black-on-black Ableton logo typifies an overall design philosophy of keeping the unit’s peripheral features in the background, leaving you to focus on where all the action truly is — those full-colour, velocity and pressure-sensitive pads.
PUSH START
Once you’ve run your fingers over the pads a few times, it’s time to plug Push into your system and open a Live set. Adding a Drum Rack will take you into Push’s drum entry mode, which splits the grid into a step sequencer, a 4×4 grid for drum triggering, and a 4×4 grid for pattern navigation. Having enough grid real estate to simultaneously accommodate a step sequencer and finger triggering section provides a lot of flexibility for improvisation: drum hits can be programmed into the step sequencer or recorded and overdubbed live, and the pattern navigation allows multiple custom patterns to be generated. The resolution of the sequencer is easily adjustable, and tempo and overall swing amounts are accessible through dedicated rotaries in this mode. Creative beatmakers will find the combination of the Push’s pressure-sensitive pads and the dedicated Note Repeat button instantly rewarding — in-vogue trap-style patterns and drum fills are only a hand’s stretch away — and dedicated buttons for setting drum accents, and doubling and duplicating patterns, round out a full set of features in the Push’s drum entry mode. All the while, the pads change colours in intuitive ways to keep you grounded.
NEED TO KNOW
A NOTE ON ISOMORPHIC LAYOUTS
Adding an Instrument will take you into Push’s note entry mode, transforming the entire grid into a playable surface adapted to the scale of your choosing or, by default, the key of C major. While scale-folding features such as this — often referred to as ‘isomorphic note layouts’ — have been retrofitted into grid-based controllers like Launchpad via crafty Max for Live scripts, the built-in execution on Push is a first for mainstream controllers.
Depending on your scale selection, the colours of the pads change to keep you oriented — root notes are marked deep blue, other notes within the scale are white. If you enter Push’s Chromatic mode, non-scale notes are also shown in the grid but are greyed out. This has the effect of turning Push’s grid into a glorious cheat-sheet for those without the relevant musical training to always play in key; good news for anyone short of their 10,000 hours. It also means that as you explore and learn melodic patterns and chord structures on the grid, these patterns and shapes can be transferred between scales — learn to play a major triad in C major on Push (a simple triangle shape), and you’ve instantly learned to play a major triad in any key.
Generous Ableton users are already uploading charts of the most common chord shapes online — which suggests the possibility for Push to be used as an educational tool. If you’re a guitarist or pianist you’ve probably forgotten how intimidating the fretboard or keyboard appeared during those tentative first lessons. An isomorphic note grid, with colour-changing pads as a guide, allows those who are just beginning to understand how music is made to easily access the building blocks of harmony, and its not hard to imagine how the Push could be a used in a music classroom to teach music theory. With an increasing number of electronic music producers looking to conventional music theory principles for inspiration, the Push’s unique isomorphic mode opens the door into a world that can otherwise appear intimidating to self-taught musicians and composers.
NOT JUST PADDING
In the end, the Push really is all about those pads, as you’ll be spending the majority of your time on the unit tapping, hitting and pushing them. I found them to be responsive and expressive, and immediately musical. In instrument mode, I quickly found myself trying to emulate fluid melodic sequences that I might otherwise be executing on a piano or guitar, which is not something any other grid of pads has suggested to me before. The pads are firm and have very little give, and do not depress like the button-style pads found on the Launchpad. Some users have found the pads to be ‘hard’ on fingers — the default settings for pad pressure means that many will find themselves hitting the pads uncommonly hard to achieve maximum velocity hits. Those with a light touch will want to adjust Push’s velocity curve settings hidden away in User mode.
Finding the right balance of sensitivity and expression when adjusting velocity and pressure curves is really the key to making the pads “feel right” for you, and some might be disappointed that there aren’t more options in terms of fine-tuning that balance on the Push, especially given how crucial the pads are to the device’s workflow. For example, a simple calibration tool via Push’s LED display could give visual feedback as to how the pads are reacting to a user’s specific style of playing – or, perhaps, a software-based tool could allow advanced users to draw their own custom velocity curves. The good news is that Ableton is at work on developing these tools in a coming update – in the meantime, elite users in need of deeper customisation could perhaps turn to Max for Live to create custom solutions.
LIGHT UP YOUR SESSION
Finally, Push’s session mode rounds out its trio of workflow modes. It allows you to arrange, edit and trigger clips in Live’s Session View. Musical ideas that are generated through improvisation in Push’s note entry modes are automatically captured as clips in Session View, and you can move fluidly to flip between note entry modes and session mode to continue the development and arrangement of your ideas on the fly. The full-colour RGB pads allow Push to accurately relay any custom colour-coding you have made for your clips in Live; this most simple of hardware improvements makes Push instantly feel more tightly integrated with Live’s session than previous clip-triggering hardware options. A note about the lights however — Push can be powered via USB but to get the full brightness out of your lights you’ll need to attach the supplied power adapter. In a dark room or on a dimly-lit stage, the slightly dimmer USB-powered lights would be more than sufficient, but I found in my brightly lit studio that I had difficulty knowing whether a backlit button was enabled or disabled. Once you know Push’s layout like the back of your hand this won’t be an issue, but to start with you’ll want to plug that power adapter in.
There’s a lot to take in, in terms of Push’s multiple modes and workflows, and to be honest, my initial experience was a bit disorienting. Despite being very familiar with the Live software — or perhaps because of that familiarity — I didn’t immediately warm to Push’s way of working, and found myself hitting brick walls soon after plugging it in. This may not be a device you can simply feel your way around, so to get the most out of it you’ll want to dig in to Push’s manual or, like I did, make your way through the extremely helpful series of Learn Push videos that have been uploaded to the Ableton website.
CHARACTER FLAWS
Some more attention could definitely have been given to Push’s LED display and menu system. Its bleak monochromatic orange-on-black text display definitely lends the device some retro cool, but at times it can feel like you are interfacing with an MS-DOS terminal rather than a next-generation controller. I get the sense that hardware limitations have forced the hand of the UI designers — menus are clunky, and text is fixed-width and large, which makes it very readable but also seriously limits the space provided to display information.
One example of this is that device and track names — and, crucially, device parameters — are squeezed down to eight-character abbreviations. Drag a multiband dynamics plug-in onto your newly improvised instrument, for example, and it’ll appear as MltbndD in your device chain. This I can live with; less useful is how its eight default parameters are communicated: AbvThrsh, AbvRT(Lw, AbvThrsh, AbvRt(Md, and so on. Seasoned Live users and experienced sound engineers might quickly be able to decode these runes, but beginners will struggle, and as much fun as it is to simply explore sounds and not sweat the text so much, clear communication of information is important if you’re going to do more with Push than fool around.
An overall lack of context means that, especially as you are familiarising yourself with the device, it’s easy to get lost. When other hardware can make creative use of limited display space and resolution — the Elektron Octatrack, and the quirky but also very intuitive Teenage Engineering OP-1, immediately spring to mind — Push’s display appears rudimentary. Future upgrades of Push’s firmware may be able to make more creative use of the limited monochromatic display.
These display limitations are perhaps a reminder that Push is intended as an adjunct to Ableton’s powerful software suite, and not as a replacement for it. Ableton’s tutorial videos themselves acknowledge that after indulging in a session of experimentation and composition on Push, you will then be moving into the software environment to then mix and edit your arrangements in greater detail. This puts the focus back on the more creative, playful aspects of Push — use the Push to express yourself and to smoothly capture that initial spark of an idea, and then delve into Live’s powerful DAW options to mould your composition into a layered, structured work.
LIVE SKETCHPAD
So is Push a ‘music making instrument’? I think a more accurate term might be ‘sketchpad’. There’s a learning curve that might throw up a couple of obstacles initially, but once Push’s workflow becomes instinctive, it becomes a powerful tool. Push and Live make a formidable combination, allowing the smooth and free-flowing development of musical ideas from their embryonic form through to final arrangement and mix down. The Push’s execution of an isomorphic layout for note entry is truly inspiring, and hints at entirely new modes of performing and composing. Its drum sequencing and entry mode is solid, the pads feel great, and the unit is built to last. Push represents a new generation of MIDI controller that goes beyond the cheap and cheerful, and is a desirable addition to any studio or stage setup, especially for fans of Live’s unique and intuitive workflow.


RESPONSES